

Creating a desktop pool with Ubuntu Linux is not difficult. Today I will go through the procedure of how to prepare an Ubuntu desktop for the purpose. The procedure includes following parts.
1. Install Ubuntu Desktop
The very first step of creating a Linux Desktop Pool is setting up a Linux desktop. Let's start from here. We are using Ubuntu Desktop version 20.04 for this setup. Please download the ISO from the Ubuntu website.
Create a VM and mount the Ubuntu ISO. Start the VM and connect to the console. Click "Install Ubuntu".

Select corresponding keyboard layout. Click "Continue".

Select "Normal Installation". Click "Continue".

Select "Erase disk and install Ubuntu". Click "Install Now".

Click "Continue".

Select corresponding time zone. Click "Continue".

Provide login information and click "Continue".

Wait for installation to complete. Run the installation completed. Reboot the VM and login to the Ubuntu.

2. Install Horizon Agent
The next step will be installing the Horizon Agent. You can download the agent from your VMware Connect account.
You will find the agent file with name similar to following highlighted item. Download it to the Ubuntu Downloads folder.

Open the Terminal
Go to the path of the agent file by command "cd ~/Downloads".
Run command "sudo tar -zxvf VMware-horizonagent-linux-x86_64.........................".

A folder with the same name of the agent file will be created. change directory to the folder by "cd VMware-horizonagent-linux-x86_64.........................".

Run command "sudo ./install_viewagent.sh -A yes" and wait for installation to complete.

3. Extra Ubuntu Configuration
After the installation completed. We will make some extra configuration on the Ubuntu.
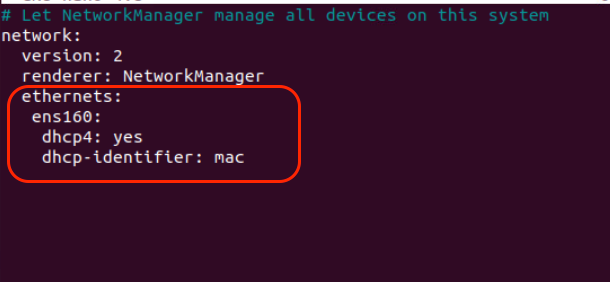
The most important configuration I am showing is making modification on network setting. Starting from Ubuntu 18.xx, it is no longer using MAC address as identifier to obtain IP from DHCP. We have to instruct the Ubuntu using MAC as DHCP identifier.
Without such modification, all Ubuntu desktops cloned will have same IP address assigned even though they have different MAC address.
a. Push MAC address as DHCP identifier
Login the Ubuntu. Open the "Terminal".
Run command "ip a". Write down the name of the network card. It will be used in later step.

Run command "sudo nano /etc/netplan/01-network-manager-all.yaml".

Make sure following line has been added to the configuration file. And make sure the network card name is same as what you written down.
b. Enable copy and paste for clipboard
To enhance security on VDI, the clipboard is disabled the copy and paste from VDI to Client by default. To enable copy and paste form both sides, need to modify following config file on master image.
Open the Terminal. Run command "sudo nano /etc/vmware/config".

Make sure following line is configure as "Clipboard.Direction=1".

Save and reboot the Ubuntu.
----- END -----
Comments